


Flexi Labels Guide to Proofing and Approving Your Printed Labels
Is this the first time you have ordered printed labels from Flexi Labels, or are you just reading up on ways to improve your printed products? Flexi Labels offers a full colour digital printing service in addition to the plain label range. So what is the process and how do you get started?
How Artwork Setup Impacts Your Proof
The artwork set-up plays a critical role in how your labels are printed on the press. By uploading artwork aligned with our artwork guidance before placing your order, the proofing process will be efficient, and the final products will look the best they possibly can!
When preparing your artwork for your job, here are some key tips on ensuring your designs are ready for upload:
1. Colour Accuracy (CMYK Only)
Artwork must be supplied in CMYK to ensure what you see on screen matches closely to the colours that are printed. We do print digitally at Flexi Labels, and while the colours may differ slightly as we are not handling special ink colours - such as Pantones - ensuring your file is supplied in CMYK will make a big difference to the colours we print.
Files created in RGB colour mode can shift colours unexpectedly when importing into our proofing process. RGB is designed for use on screens and digital applications - such as web design and phone apps - and often has a much wider spectrum of colour available. CMYK is created using four main colours (Cyan, Magenta, Yellow and Black (Key)) and has a much smaller range of colour that can be produced.
If you are looking for a specific colour to match to, please get in touch before ordering/ approving your proof to see how we can assist. As we print digitally, a physical sample helps us to reach your intended colour.
2. Resolution Matters
Low-resolution artwork won’t magically sharpen in print. A minimum of 300 dpi ensures crisp text and imagery. Creating your designs in a dedicated programme for print (such as Adobe Illustrator) can make a big difference in the quality of the print too. Vectorised graphics - these are graphic objects which can be scaled up or down without pixelation - also help the images and text within a design document have sharper and cleaner lines, helping with legibility and a more polished final product.
Artwork deemed low resolution/ poor quality will be flagged on the proof.
3. Bleed and Safe Zones
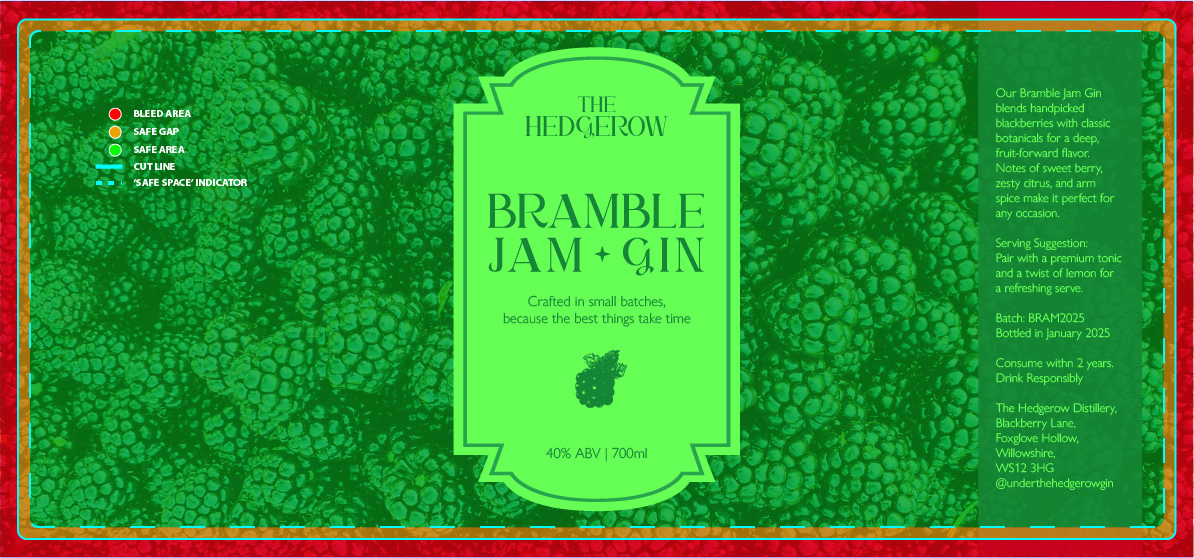
The best artwork takes into account the location of the label edge, bleed and safe gap areas when designing. The image below illustrates these design zones. Please take note of the following when designing your artwork:
- If you require edge to edge printing, we will need you to provide at least 3 mm bleed.
- Bleed is where the background colour or graphic extends beyond the label edge to ensure there are no unwanted edges in the event the printer shifts in production. Industry standard print shift tolerance is up to 1.5mm +/-.
- A safe gap sits within 2 mm of the label edge and is there to ensure that your text/artwork is not too close to the edge of the label. Your main text and graphics should sit within this zone. Should the printer shift, the key elements of your design will be protected from being printed off of the label edge.
4. Clean File Setup
We use an automated proofing system to support our proofing process. While every order runs through our design team, artworks with cut marks, colour bars, or registration marks can interfere with recognising label sizing and shapes, causing potential delays of getting a proof to you. Sometimes the inclusion of these additional marks can push your artwork off-centre.
For smoother processing, please ensure your designs are aligned centrally to the file you will upload and do not contain registration marks, colour bars or cutlines.
When these guidelines are followed, your proof becomes far more reliable—and easier to approve with confidence. If you are new to label printing and have questions on your file set-up, our team are always on hand to help you ahead of placing your order.
If you are ordering a custom shape, you will likely be working directly with a designer to achieve the desired outcome from your proofs. In this instance, some guidance may differ depending on your job's specific needs.
What is a Proof?
In the world of print, the proof is a document that digitally mocks-up your final designs, clearly states the job specifications for confirmation and is a technical representation of how your artwork will be produced.
We manufacture all our products bespoke to order and so the proofing document acts as a 'final sign-off' by the customer, formally approving the artwork and product shown in the proof will be manufactured.
Proofing is not a casual step within the printed job orders - arguably as the customer, it is the most important step as the responsibility to approve the artwork and the job specifications lies with you at this stage and is locked once acceptance of the proof has been submitted. Should an error be found in the proof after approval, Flexi Labels is not responsible for the reprinting of this order.
Understanding our Proof Approval Process
After placing a printed order with us, our team will action a proof within 2 working days. We use a proofing software named Proofscope to email your proofs across to you for the approval process.
The video below shows how to navigate this platform, use the tools to double check the necessities, and make a proofing decision through the software.
Once the proofing decision has been made, your order is automatically updated on our system. 'Approvals' will be sent straight to our production team, whereas 'Rejected' proofs will be returned to the design team for further work.
Should there be any issues with the proof, given that approved items do not bypass our designers, it is very important to raise any concerns before submitting a proofing decision.
Please be aware that the manufacturing lead time selected at the checkout (e.g. 3-5 working days) will only begin once the entire order has been approved, this lead time does not include proofing times. If you have multiple products within an order, all proofs need to be approved before the order can enter production.
Anatomy of a Flexi Labels Proof
Ordering from a company for the first time can be a daunting process. Let us walk you through a typical proof document, and the key areas that you need to be aware of.
Our proof documents look like the example below. This proof is for our sheet label products. Proofs for rolls will look very similar, but may include technical information suitable for roll products.

What Your Proof Is Really Showing You
1. Artwork - Supplied to Scale and Showing Artwork Resolution
We know that if the artwork is not correct, you need to be able to see this clearly on the proof. We set up all our proofing documents to scale, so any proofs that are downloaded and printed show accurately the size of the artwork for legibility checks.
Understanding that the artwork has been created to scale also helps to understand the quality/ resolution of the final print. If you can clearly see pixelation on your proof, the chances are the final print will look just as pixelated. Proofs can be downloaded, and printed 100% to scale for a final check to ensure you are happy the artwork and text meets your legibility requirements.
2. Cut Line - Placement In Relation to Artwork
The cut line on our proofs is shown as a blue line set up to the correct size and shape as the label product ordered through our website. While we do not print this blue cut line on the final product, it demonstrates clearly in the proof how we intend on positioning your artwork within the label in production.
If you are unhappy with how your text/ graphics/ design has been positioned, please either reject the proof, or inform our design team so we can issue a new version of the proof following feedback.
3. Technical Data - Your Product Specifications
The technical data sheet is a copy of your order confirmation, outlining the product shape, size, corner radius (if applicable), quantity, print/ special finishes, material choice and version number of the proof that you are viewing. It is important that these details are also checked before approval as these details contribute to how we build your final product, and cannot be rectified once a proof has been accepted should they be found to be incorrect.
If you have any queries regarding the product specification, it is advised that these concerns are raised before approving the proof before production. On approval, the job will be moved directly into production and may be handled by a different member of the team.
4. Final Print Mock-Up - How Will a Template Look?
Unless you have supplied a print-ready template, all our proofs are set up to show a singular design/ label. We do this to minimise errors in the proofing process by handling one artwork per proof.
Once approved, the artwork will be templated according to the product you have picked.
5. Designer Warning - A Must Read Before Approval
Sometimes our team will leave a 'warning' within a proof. Likely reasons for a message to be left by our team include, but are not limited too;
- The artwork is low resolution which will cause a pixelated print
- White borders were applied as not enough bleed was supplied
- White borders were applied as the label extends to the edge of the sheet
- Please check the legibility of artwork as the text appears small
- Artwork is too close to the label edge and risks being cropped off.
Our team rarely amend artworks due to potential compatibility issues with fonts or colours should we edit them. If a team member raises a warning within a proof and you are unsure, please get in touch with the team for clarity before approving as advised throughout documentation throughout the approval process.
6. How to Proceed - Making your Proofing Decision
This section in the proof document outlines the three ways to submit your decision on how to proceed with a proof. Within the approval process, you can receive up to three versions of a proof within your printed order pricing to ensure you are fully happy with your labels. Below describes how best to communicate with our team any changes you may have before your order moves to production.
- Approval - confirms the order. Within our proof viewing software you need to complete a final checklist to lock in your decision to send your confirmed product to print. Once approved, your decision is automatically logged and your job is moved from the design team to production for templating.
- Reject - allows you to reject a proof and highlight to the team a discrepancy that needs fixing before a new version of the proof can be generated.
- Email Us - it is in our best interest to help you to achieve the label products that you are looking for. Should you have any concerns, please always raise with the team where we can assist.
7. Things to Consider Before Approving - A Final Important Read
Approving a proof might feel like a quick admin step—but it’s one of the most critical moments in the entire print process. This section of the proofing document runs through some of the common mistakes and best practises to think about and triple check you are happy with before submitting the final confirmation.
This section includes information on lead times, industry standard print shift tolerance, colour considerations, text legibility, spelling mistakes, graphical glitches, artwork positioning, barcode/ QR code compatibility amongst a few other important factors to take into account. All products are personalised to the specific requirements outlines on a proof and it is important to raise any concerns prior to approval as errors found and raised after acceptance of the proof will not be reprinted.
Why Careful Proofing Makes All the Difference
A few extra moments spent reviewing your proof can go a long way in ensuring your final product is accurate, consistent, and ready for print with confidence. Spending a little extra time on your proof review can make a big difference. It helps ensure:
- Your artwork prints exactly as expected
- Your timelines stay on track
- Your branding remains consistent
- Your finished labels are ready to impress
A careful check now means you can approve your proof with complete peace of mind. Our design team are always on hand to assist you with any queries throughout the approvals process, from artwork guidance to understanding technical information.
For any feedback or questions on your artwork or the proofing process, please don't hesitate to get in touch - designer@flexilabels.co.uk


